Difference between revisions of "Adapter V3 manual"
| (54 intermediate revisions by 2 users not shown) | |||
| Line 1: | Line 1: | ||
Updated on 2024/3/21 | |||
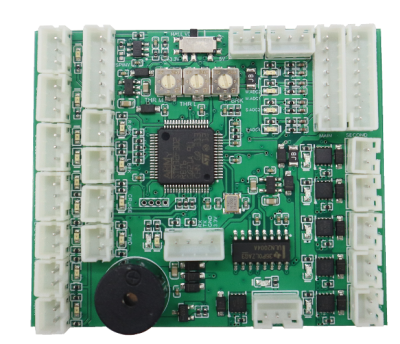
The Adapter V3 is designed to make wiring and configurating more conveniently and intuitively for build the e-bike/e-scooter and other vehicle types. It's a upgrade version of our Adapter V2. | |||
By placing LEDs for each port, input and output, it will be the most easy way to verify and diagnosis your wiring, even the analog throttle input and output. | |||
And by make two simple calibrations (throttle and optional analogy brake input), the configurations on the VESC tool can be simply import a app-config file we provided instead. | |||
Also we changed all the output to hi-side PMOS switch, this is more convenient to use co-ground lights, which is popular in the market. | |||
Buy link: https://spintend.com/collections/diy-electric-scooter-parts/products/ewheel-adc-adapter-v3-for-diy-ebike-escooter-with-vesc | |||
[[File:Adapter V3.png|frameless|400x400px]] | |||
Size: 63 x 53 x 12.5 mm | Size: 63 x 53 x 12.5 mm | ||
= Features = | |||
#Horn, head light, turn light, brake & rear light, and reverse light support. | |||
#'''All FETs are hi-side PMOS''', support co-ground lights. | |||
#High, middle, low, 3 level throttle support. | |||
#Motor reverse and cruise support. | |||
#Buzzer to prompt turn and settings. | |||
#Support both hall/analog brake and mechanical brake input. | |||
#'''Throttle current monitor''', clear the VESC throttle ADC1 immediately when the throttle's '-' wire broken, ignores the pull-upped throttle input. | |||
#Two/one wheel drive support. | |||
#Convert 5V throttle and analog brake input signal to 3.3V range, no harm to VESC. | |||
= Wiring = | |||
[[File:Ewheel ADC Adapter V3 wiring diagram.jpg|border|frameless|568x568px]] | |||
Wiring | |||
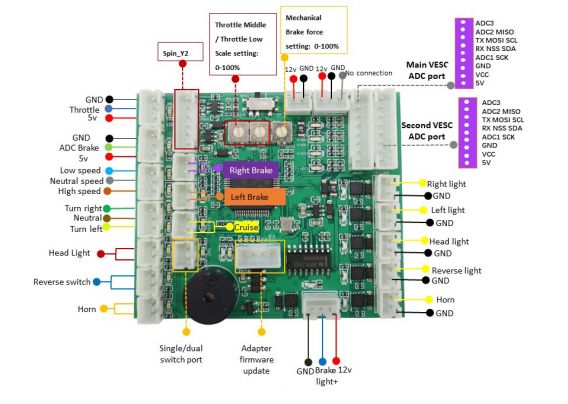
* Mechanical brake, light, horn, reverse and cruise are actually switches, we don't need to distinguish the two wires of each switch. | |||
* The turn left/right switch and throttle level switch, they usually has three wires, the '''neutral''' '''wire''' is the one which can be switched on/off to other wires, so if you are not sure the wire orders, use a multimeter to test them to find the neutral wire first, then know what the rest two wires are. | |||
* Usually, hand bar throttle or thumb throttle have three wires: '''black, red, green, corresponding to GND, 5V, throttle output'''. | |||
* Users can also use these type of throttles to make ADC(analog) brake, in Adapter V2, the '''ADC brake''' signal is transferred to VESC's ADC2 pin. | |||
* The second VESC ADC PORT is for two wheel drive config, '''if you have one wheel drive only, connect MAIN PORT to VESC'''. | |||
* Adapter need a 5V and 12V power source, the 5V is get from VESC ADC port, users need to connect a 12V power source to adapter's 12V socket, for Ubox V2 connect to its FAN socket. | |||
* The rear and brake light, usually comes with three wires in common ground connection mode, the two lights share one GND. '''Connect the positive(anode) wire of rear light to 12V, and brake light's to Brake light+, and their negative(cathode) wire to GND.''' | |||
* The other lights and horn are also high side switched, so connect the '''positive(anode) wire to the function pin''', and the '''negative(cathode) wire to the pin to the 'G' pin'''. | |||
* For '''Ubox single 75V''', the extra NRF port is not available, or for the other VESCs without NRF port (some vendor referred as second UART), if the cruise and reverse functions are not needed, the TX and RX pin from the 8 pin port can connect to VESC Bluetooth by pick out the wires from the cable. Or you can refer to this small kit : the single VESC UART port seperator:https://spintend.com/collections/diy-tools-and-accessory/products/single-vesc-uart-port-seperator | |||
= The throttle, brake , their switch and potentiometers = | |||
Some e-bike/e-scooters have 3 level throttles, VESC does not support 3 level. | |||
The throttle, brake, their switch and potentiometers | |||
Some | |||
Most throttle working on 5V, and output voltage up to 4.2V, VESC can only accept ADC input within 3.3V (3.44V for some hard ware version). | Most throttle working on 5V, and output voltage up to 4.2V, VESC can only accept ADC input within 3.3V (3.44V for some hard ware version). | ||
VESC supports analog brake (variable/ | VESC supports analog brake (variable/proportional) input to its ADC2, common e-bike/e-scooter only provide a electronic switch attached to mechanical brake. | ||
The | The Adapter V3 do these translating jobs, makes VESC a full functional e-bike/scooter controller. | ||
The | The Adapter V3 divide the up to 5V throttle input, remap it to 3.3V levels, send to VESC ADC1. So do the analog brake input, remap it, send to VESC ADC2, if there is any mechanical brake switch being triggered, Adapter V3 send the brake potentiometer's voltage to the ADC2 instead. | ||
[[File:Ewheel adc adapter v3 support different speed level and brake.png|none|thumb|500x500px]] | |||
The potentiometers are '''increase clockwise''' and '''decrease counterclockwise'''. | The potentiometers are '''increase clockwise''' and '''decrease counterclockwise'''. | ||
=== throttle and brake power supply === | |||
If your throttle can only accept 3.3V supply, set the ‘HALL VDD’ switch to '3.3V' side. Otherwise set it to '5V'. The analog brake port shares this supply too. | |||
=== Throttle potentiometers === | |||
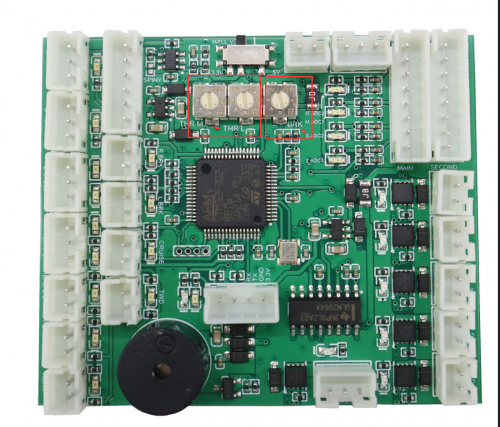
Adapter V3 supports three level throttles, the High level is equal to the throttle handle in put. The middle and low level are remapped from throttle handle input according to the 'THR M' and 'THR L' potentiometer's positions. The remap range is from 0 to 100%. | |||
'''If you are not connect a three level throttle switch to adapter, in case you don't have it or don't need it, the default throttle level is middle, so adjust the''' '''<nowiki/>'THR M' potentiometer to its maximum position (clockwise), let the adapter not shrink the''' '''original throttle to''' '''the VESC.''' | |||
=== Brake potentiometer === | |||
Mechanical brake have a electronic switch, to tell ESC to stop driving, some ESC can then do regenerative braking. | |||
When trigger the mechanical brake switch, Adapter V3 will assist it with regenerative brake automatically, the regenerative brake strength is according to the 'BRK' potentiometer, from 0 to 100%. '''Set it to its maximum position when do the input setup on the VESC tool.''' | |||
=== Analog/variable brake === | |||
When no actions happened from mechanical brake(no braking), Adapter V3 will conduct the analog voltage from "ABRK" to the VESC ADC2. There for to support the analog/variable brake. | |||
Analog/variable brake | |||
When no actions happened from mechanical brake(no braking), | |||
=== What if I don't want a regenerative brake? === | |||
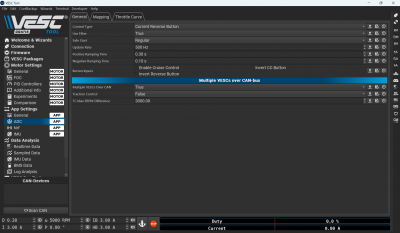
So the ADC2 input is no needed for VESC, set the APP mode to "Current", set to "Current Reverse Button" mode if you need a reverse function. | So the ADC2 input is no needed for VESC, set the APP mode to "Current", set to "Current Reverse Button" mode if you need a reverse function. | ||
[[File:Current Reverse button.png|frameless|400x400px]] | |||
The | === The brake, throttle level, and turn left/right switch === | ||
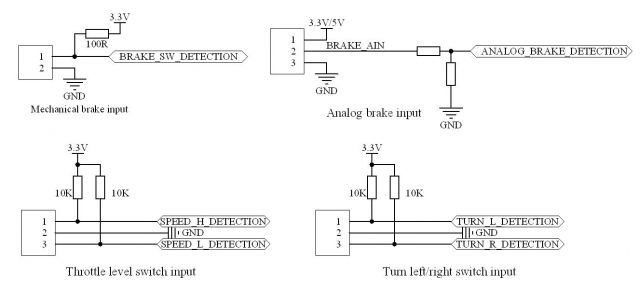
[[File:The brake, throttle level, and trun leftright switch.jpg|border|frameless|640x640px]] | |||
The | == The cruise, reverse, and horn inputs == | ||
[[File:The cruise, reverse, and horn function.jpg|frameless|619x619px]] | |||
== The lights and horn output ports == | |||
[[File:The lights and horn output ports.jpg|frameless|630x630px]] | |||
= '''Throttle current monitor''' = | |||
= Calibrations before use = | |||
By knowing the exactly input range of the throttle and analog brake, Adapter V3 can output precise and full range voltage signal to VESC. To achieve this, we need do the calibration. | |||
The entry is by giving adapter a high enough signal and hold on the left brake when you power on Adapter V3, holding left brake more than 3 seconds to exit calibration. | |||
Steps for throttle calibration, from power off state: | |||
# Hold the left brake and the maximum throttle, then power on the adapter. | |||
# Wait the buzzer beep 4 times, release the left brake, the green and red LED will start to blinking. Calibration mode entered. | |||
# Roll throttle forward and backward to full trip repeatedly (3-5 times). | |||
# Release the throttle, and hold the left brake more than 3 seconds. Wait the buzzer beep 2 times. | |||
# Quit, to check the LEDs on the adapter, there're LEDs in front of each function port, trigger each function, then the led will light on accordingly. eg , when you push throttle, the throttle indication led should response strong green light accordingly. | |||
Steps for analog brake calibration is similar to throttle calibration, except we need to operating the brake input, in stead of throttle input. | |||
'''We have a [https://youtu.be/AMWHuRQtMSE?si=e-eXKbJlTsyZR6MP tutorial video] to demonstrating the input calibration for Adapter V3.''' | |||
= Setup in VESC tool = | |||
We suggest to import our pre-configured App Configuration xml file directly, file link: | |||
https://github.com/JohnSpintend/Adapter-V3-FW/blob/main/VESC%20app%20configuration%20file%20for%20Adapter%20V3.xml | |||
Video: https://youtu.be/AG2tJWBJxPk?si=GKEKD_KVNpefskuN | |||
If you want to config the VESC manually, follow below steps: | |||
# Connect VESC to the VESC tool, read and reset the App settings. If you are configuring '''multi-wheel driving''', go to '''<nowiki/>'Can Message Rate 1', set the checkboxes 'status 1 - 4'''' or more if you need them. | |||
# Go to App Settings->General->General page, '''set 'APP to use' to 'ADC''''. | |||
# App Settings->ADC->General page, '''set 'Control Type' to 'Current No Reverse Brake ADC2'.''' If you want use '''cruise function, set the checkbox ‘Enable Cruise Control’.''' | |||
# App Settings->ADC->Mapping page, '''set 'ADC1 Start Voltage' to 0.1V, ADC1 End Voltage to 3.1V, 'ADC2 Start Voltage' to 0.1V, ADC2 End Voltage to 3.1V.''' | |||
# Write the App configuration to VESC. | |||
# Finished, to try the throttle/brake to check if they are working properly. | |||
=== Constant TWD/multi-WD configuration === | |||
If you want to build a CAN bus relayed multi-driving system, as one VESC accepts the throttle input, the others follow it by CAN bus connection, just config the VESC who accepts the throttle input with above steps, then config the rest of the VESCs as: | |||
# Read and reset the App settings. | |||
# App Settings->General->General page, '''set 'APP to use' to 'no App', or 'UART'''' if you want UART communication with this VESC. | |||
# App Settings->General->General page, in ''''CAN Message Rate1', set the 'Status1-4'''<nowiki/>' check boxes. | |||
# Write the App configuration to this VESC. | |||
'''Tip:''' If you can not find all the VESCs on the CAN bus, may be some of them have same VESC ID, they are in '''App Settings->General->General page,''' you can try to modify them manually, or reset the App settings. | |||
= Concludes and explains = | |||
# The 'power limit mode', and 'two/one way throttle switching mode' in adapter V2, are been canceled now, they are rarely used, and some times make confusion. | |||
#The reverse function is mapped on to the RX pin of VESC's ADC & UART socket. And the cruise function onto the TX pin. So we suggested to '''use ADC only mode instead of ADC and UART mode'''. This is a link to illustrate the mapping of TX RX pins: https://vesc-project.com/node/600 | |||
#If you don't need the reverse and cruise function, you can set the 'APP to use' to 'ADC and UART'. | |||
#There are many ADC control mode in the VESC, the most flexible mode is '''Current Reverse ADC2 Brake Button,''' it supports cruise, reverse, and ADC brake, if you want a button brake, you can let the brake input connect to a button with the other pin of the button connected to VDD (3.3V). | |||
#For UBox's power button click function, please refer: [[The power button of Ubox|The power button of Ubox.]] | |||
#On Ubox dual, the two/one wheel drive switching can also be achieved by Ubox's power button to turn on/off its internal CAN bus connection. | |||
#For the ignite key and voltage meter of Ubox V2, Ubox single 100V, Ubox ALU family , please refer: [[The CAN-IN and IGNITE socket of Ubox V2|The CAN-IN and IGNITE socket of Ubox V2.]] | |||
#With out the 5V power source from the VESC, the MCU of adapter V3 can working with 12V power source, but the power supply for the throttle/analog brake are limited to about 4.5V, not 5V, if you switch the 3.3V/5V switch to 5V. | |||
# | |||
= Caution and limits = | |||
# '''Use a battery to power the system instead of a AC adapter power source, because AC adapter can't handle the brake current, will damage the ESC or power source. And recommend to add a fuse in to the power line to deal with accidents.''' | |||
# '''For two/one wheel drive switchable mode, when switch to one wheel mode, the ADC1 and ADC2 pins of secondary ESC are floating! This is the default circuit design of most VESC hardware,''' '''a floating ADC input is easy to be interfered, cause the ESC out of control! Make pull down resistors on ADC pins to the GND, 20K - 30K is usually appropriate.''' Ubox V2 and Ubox single 100V have built in pulldown resistors, no need extra pulldown resistors. | |||
# Since our solution is based on open source VESC, users should fully understand the risks of open source projects. This article only describes the possibility of this build method, and is not responsible for the damage and accidents caused by user themselves. | |||
# This product is for DIY purpose, so we only offer a very limited warranty. | |||
= FAQ = | |||
FAQ | |||
=== Q: What is the requirement of the lights and horn? === | |||
A: The adapter is designed for 12V power source, so they need to be 12V spec. And the total current is limited within 3A, if you are using Ubox as 12V power source. | A: The adapter is designed for 12V power source, so they need to be 12V spec. And the total current is limited within 3A, if you are using Ubox as 12V power source. | ||
Q: Can my Bluetooth or DAVEGA share the 8 pin UART-ADC port with adapter V2? | === Q: Can my Bluetooth or DAVEGA share the 8 pin UART-ADC port with adapter V2? === | ||
A: The Bluetooth and DAVEGA are using the UART port, so you can pick out the TX&RX of the UART wires from the 8pin cable to connect them, '''and set the ‘APP to Use’ to 'ADC and UART'.''' | A: The Bluetooth and DAVEGA are using the UART port, so you can pick out the TX&RX of the UART wires from the 8pin cable to connect them, '''and set the ‘APP to Use’ to 'ADC and UART'.''' | ||
Q: My VESC only have a 5V power source, can I use this adapter? | === Q: My VESC only have a 5V power source, can I use this adapter? === | ||
A: The 12V for adapter is for power the lights, and horn, the logic circuit is using the 5V, if your lights and horn can work with 5V, you can connect your 5V source into the adapter's 12V socket, they will working. | A: The 12V for adapter is for power the lights, and horn, the logic circuit is using the 5V, if your lights and horn can work with 5V, you can connect your 5V source into the adapter's 12V socket, they will working. | ||
Firmware and PC loader app | = Firmware and PC loader app = | ||
https://github.com/JohnSpintend/Adapter-V3-FW | |||
= See also = | |||
[[Main Page]] | |||
Latest revision as of 18:17, 22 March 2024
Updated on 2024/3/21
The Adapter V3 is designed to make wiring and configurating more conveniently and intuitively for build the e-bike/e-scooter and other vehicle types. It's a upgrade version of our Adapter V2.
By placing LEDs for each port, input and output, it will be the most easy way to verify and diagnosis your wiring, even the analog throttle input and output.
And by make two simple calibrations (throttle and optional analogy brake input), the configurations on the VESC tool can be simply import a app-config file we provided instead.
Also we changed all the output to hi-side PMOS switch, this is more convenient to use co-ground lights, which is popular in the market.
Size: 63 x 53 x 12.5 mm
Features
- Horn, head light, turn light, brake & rear light, and reverse light support.
- All FETs are hi-side PMOS, support co-ground lights.
- High, middle, low, 3 level throttle support.
- Motor reverse and cruise support.
- Buzzer to prompt turn and settings.
- Support both hall/analog brake and mechanical brake input.
- Throttle current monitor, clear the VESC throttle ADC1 immediately when the throttle's '-' wire broken, ignores the pull-upped throttle input.
- Two/one wheel drive support.
- Convert 5V throttle and analog brake input signal to 3.3V range, no harm to VESC.
Wiring
- Mechanical brake, light, horn, reverse and cruise are actually switches, we don't need to distinguish the two wires of each switch.
- The turn left/right switch and throttle level switch, they usually has three wires, the neutral wire is the one which can be switched on/off to other wires, so if you are not sure the wire orders, use a multimeter to test them to find the neutral wire first, then know what the rest two wires are.
- Usually, hand bar throttle or thumb throttle have three wires: black, red, green, corresponding to GND, 5V, throttle output.
- Users can also use these type of throttles to make ADC(analog) brake, in Adapter V2, the ADC brake signal is transferred to VESC's ADC2 pin.
- The second VESC ADC PORT is for two wheel drive config, if you have one wheel drive only, connect MAIN PORT to VESC.
- Adapter need a 5V and 12V power source, the 5V is get from VESC ADC port, users need to connect a 12V power source to adapter's 12V socket, for Ubox V2 connect to its FAN socket.
- The rear and brake light, usually comes with three wires in common ground connection mode, the two lights share one GND. Connect the positive(anode) wire of rear light to 12V, and brake light's to Brake light+, and their negative(cathode) wire to GND.
- The other lights and horn are also high side switched, so connect the positive(anode) wire to the function pin, and the negative(cathode) wire to the pin to the 'G' pin.
- For Ubox single 75V, the extra NRF port is not available, or for the other VESCs without NRF port (some vendor referred as second UART), if the cruise and reverse functions are not needed, the TX and RX pin from the 8 pin port can connect to VESC Bluetooth by pick out the wires from the cable. Or you can refer to this small kit : the single VESC UART port seperator:https://spintend.com/collections/diy-tools-and-accessory/products/single-vesc-uart-port-seperator
The throttle, brake , their switch and potentiometers
Some e-bike/e-scooters have 3 level throttles, VESC does not support 3 level.
Most throttle working on 5V, and output voltage up to 4.2V, VESC can only accept ADC input within 3.3V (3.44V for some hard ware version).
VESC supports analog brake (variable/proportional) input to its ADC2, common e-bike/e-scooter only provide a electronic switch attached to mechanical brake.
The Adapter V3 do these translating jobs, makes VESC a full functional e-bike/scooter controller.
The Adapter V3 divide the up to 5V throttle input, remap it to 3.3V levels, send to VESC ADC1. So do the analog brake input, remap it, send to VESC ADC2, if there is any mechanical brake switch being triggered, Adapter V3 send the brake potentiometer's voltage to the ADC2 instead.
The potentiometers are increase clockwise and decrease counterclockwise.
throttle and brake power supply
If your throttle can only accept 3.3V supply, set the ‘HALL VDD’ switch to '3.3V' side. Otherwise set it to '5V'. The analog brake port shares this supply too.
Throttle potentiometers
Adapter V3 supports three level throttles, the High level is equal to the throttle handle in put. The middle and low level are remapped from throttle handle input according to the 'THR M' and 'THR L' potentiometer's positions. The remap range is from 0 to 100%.
If you are not connect a three level throttle switch to adapter, in case you don't have it or don't need it, the default throttle level is middle, so adjust the 'THR M' potentiometer to its maximum position (clockwise), let the adapter not shrink the original throttle to the VESC.
Brake potentiometer
Mechanical brake have a electronic switch, to tell ESC to stop driving, some ESC can then do regenerative braking.
When trigger the mechanical brake switch, Adapter V3 will assist it with regenerative brake automatically, the regenerative brake strength is according to the 'BRK' potentiometer, from 0 to 100%. Set it to its maximum position when do the input setup on the VESC tool.
Analog/variable brake
When no actions happened from mechanical brake(no braking), Adapter V3 will conduct the analog voltage from "ABRK" to the VESC ADC2. There for to support the analog/variable brake.
What if I don't want a regenerative brake?
So the ADC2 input is no needed for VESC, set the APP mode to "Current", set to "Current Reverse Button" mode if you need a reverse function.
The brake, throttle level, and turn left/right switch
The cruise, reverse, and horn inputs
The lights and horn output ports
Throttle current monitor
Calibrations before use
By knowing the exactly input range of the throttle and analog brake, Adapter V3 can output precise and full range voltage signal to VESC. To achieve this, we need do the calibration.
The entry is by giving adapter a high enough signal and hold on the left brake when you power on Adapter V3, holding left brake more than 3 seconds to exit calibration.
Steps for throttle calibration, from power off state:
- Hold the left brake and the maximum throttle, then power on the adapter.
- Wait the buzzer beep 4 times, release the left brake, the green and red LED will start to blinking. Calibration mode entered.
- Roll throttle forward and backward to full trip repeatedly (3-5 times).
- Release the throttle, and hold the left brake more than 3 seconds. Wait the buzzer beep 2 times.
- Quit, to check the LEDs on the adapter, there're LEDs in front of each function port, trigger each function, then the led will light on accordingly. eg , when you push throttle, the throttle indication led should response strong green light accordingly.
Steps for analog brake calibration is similar to throttle calibration, except we need to operating the brake input, in stead of throttle input.
We have a tutorial video to demonstrating the input calibration for Adapter V3.
Setup in VESC tool
We suggest to import our pre-configured App Configuration xml file directly, file link:
Video: https://youtu.be/AG2tJWBJxPk?si=GKEKD_KVNpefskuN
If you want to config the VESC manually, follow below steps:
- Connect VESC to the VESC tool, read and reset the App settings. If you are configuring multi-wheel driving, go to 'Can Message Rate 1', set the checkboxes 'status 1 - 4' or more if you need them.
- Go to App Settings->General->General page, set 'APP to use' to 'ADC'.
- App Settings->ADC->General page, set 'Control Type' to 'Current No Reverse Brake ADC2'. If you want use cruise function, set the checkbox ‘Enable Cruise Control’.
- App Settings->ADC->Mapping page, set 'ADC1 Start Voltage' to 0.1V, ADC1 End Voltage to 3.1V, 'ADC2 Start Voltage' to 0.1V, ADC2 End Voltage to 3.1V.
- Write the App configuration to VESC.
- Finished, to try the throttle/brake to check if they are working properly.
Constant TWD/multi-WD configuration
If you want to build a CAN bus relayed multi-driving system, as one VESC accepts the throttle input, the others follow it by CAN bus connection, just config the VESC who accepts the throttle input with above steps, then config the rest of the VESCs as:
- Read and reset the App settings.
- App Settings->General->General page, set 'APP to use' to 'no App', or 'UART' if you want UART communication with this VESC.
- App Settings->General->General page, in 'CAN Message Rate1', set the 'Status1-4' check boxes.
- Write the App configuration to this VESC.
Tip: If you can not find all the VESCs on the CAN bus, may be some of them have same VESC ID, they are in App Settings->General->General page, you can try to modify them manually, or reset the App settings.
Concludes and explains
- The 'power limit mode', and 'two/one way throttle switching mode' in adapter V2, are been canceled now, they are rarely used, and some times make confusion.
- The reverse function is mapped on to the RX pin of VESC's ADC & UART socket. And the cruise function onto the TX pin. So we suggested to use ADC only mode instead of ADC and UART mode. This is a link to illustrate the mapping of TX RX pins: https://vesc-project.com/node/600
- If you don't need the reverse and cruise function, you can set the 'APP to use' to 'ADC and UART'.
- There are many ADC control mode in the VESC, the most flexible mode is Current Reverse ADC2 Brake Button, it supports cruise, reverse, and ADC brake, if you want a button brake, you can let the brake input connect to a button with the other pin of the button connected to VDD (3.3V).
- For UBox's power button click function, please refer: The power button of Ubox.
- On Ubox dual, the two/one wheel drive switching can also be achieved by Ubox's power button to turn on/off its internal CAN bus connection.
- For the ignite key and voltage meter of Ubox V2, Ubox single 100V, Ubox ALU family , please refer: The CAN-IN and IGNITE socket of Ubox V2.
- With out the 5V power source from the VESC, the MCU of adapter V3 can working with 12V power source, but the power supply for the throttle/analog brake are limited to about 4.5V, not 5V, if you switch the 3.3V/5V switch to 5V.
Caution and limits
- Use a battery to power the system instead of a AC adapter power source, because AC adapter can't handle the brake current, will damage the ESC or power source. And recommend to add a fuse in to the power line to deal with accidents.
- For two/one wheel drive switchable mode, when switch to one wheel mode, the ADC1 and ADC2 pins of secondary ESC are floating! This is the default circuit design of most VESC hardware, a floating ADC input is easy to be interfered, cause the ESC out of control! Make pull down resistors on ADC pins to the GND, 20K - 30K is usually appropriate. Ubox V2 and Ubox single 100V have built in pulldown resistors, no need extra pulldown resistors.
- Since our solution is based on open source VESC, users should fully understand the risks of open source projects. This article only describes the possibility of this build method, and is not responsible for the damage and accidents caused by user themselves.
- This product is for DIY purpose, so we only offer a very limited warranty.
FAQ
Q: What is the requirement of the lights and horn?
A: The adapter is designed for 12V power source, so they need to be 12V spec. And the total current is limited within 3A, if you are using Ubox as 12V power source.
A: The Bluetooth and DAVEGA are using the UART port, so you can pick out the TX&RX of the UART wires from the 8pin cable to connect them, and set the ‘APP to Use’ to 'ADC and UART'.
Q: My VESC only have a 5V power source, can I use this adapter?
A: The 12V for adapter is for power the lights, and horn, the logic circuit is using the 5V, if your lights and horn can work with 5V, you can connect your 5V source into the adapter's 12V socket, they will working.
Firmware and PC loader app
https://github.com/JohnSpintend/Adapter-V3-FW
