Difference between revisions of "Spin-Y manual"
| (12 intermediate revisions by the same user not shown) | |||
| Line 82: | Line 82: | ||
#Quit, hold the rear button more than 3 seconds again, till the yellow LED stop blinking, and the green LED on. | #Quit, hold the rear button more than 3 seconds again, till the yellow LED stop blinking, and the green LED on. | ||
#Check if the function is normal, if not, go to step 1 and try again. | #Check if the function is normal, if not, go to step 1 and try again. | ||
===Start point adjust for normal | ===Start point adjust for normal ESC=== | ||
Start point is for normal ESC, usually they required the start voltage at 0.7V and end voltage 4.2V. | Start point is for normal ESC, usually they required the start voltage at 0.7V and end voltage 4.2V. | ||
| Line 90: | Line 90: | ||
#Quit, hold the rear button more than 3 seconds again, till the green LED turn to solid on. | #Quit, hold the rear button more than 3 seconds again, till the green LED turn to solid on. | ||
#Check if the start point is meet your requirement, if not, go to step 1 and try again. | #Check if the start point is meet your requirement, if not, go to step 1 and try again. | ||
===End point adjust for normal | ===End point adjust for normal ESC=== | ||
End point is for normal ESC, the ESC's acceptation of the end voltage is varying, adjusting the end point can match their requirements. | End point is for normal ESC, the ESC's acceptation of the end voltage is varying, adjusting the end point can match their requirements. | ||
| Line 121: | Line 121: | ||
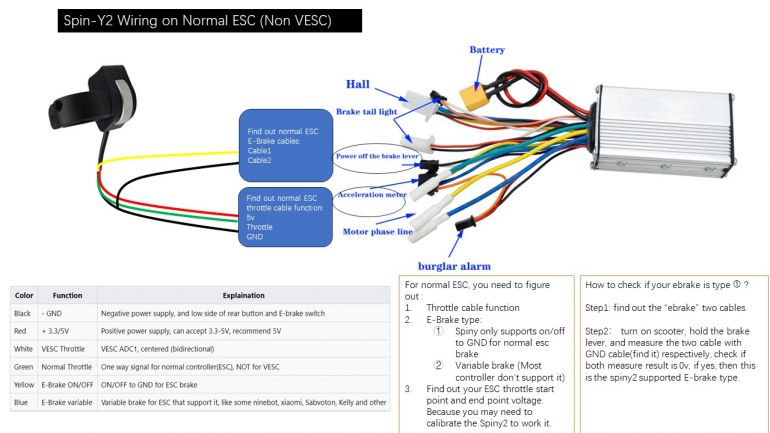
== Wiring on Non-VESC == | == Wiring on Non-VESC == | ||
[[File:Wiring on normal ESC2.jpg|frameless|770x770px]] | |||
==Wiring on VESC directly== | ==Wiring on VESC directly== | ||
| Line 142: | Line 144: | ||
|ADC1 | |ADC1 | ||
|} | |} | ||
Remark: due to Spiny-Y2 is two way throttle, it has bidirectional signal , so no need to do any wiring on ubox (or other VESC) 's ADC2 port. | [[File:Wiring on VESC.jpg|frameless|665x665px]] | ||
Remark: 1. due to Spiny-Y2 is two way throttle, it has bidirectional signal , so no need to do any wiring on ubox (or other VESC) 's ADC2 port. | |||
2. Watch detial [https://youtu.be/K-MbL6ovp3o?si=Wj7cDLFTNOv--y8S tutorial video] for your wiring and setup input. | |||
==Wiring on Adapter V2 to control VESC == | ==Wiring on Adapter V2 to control VESC == | ||
| Line 175: | Line 181: | ||
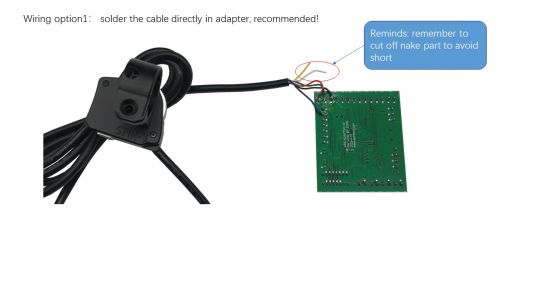
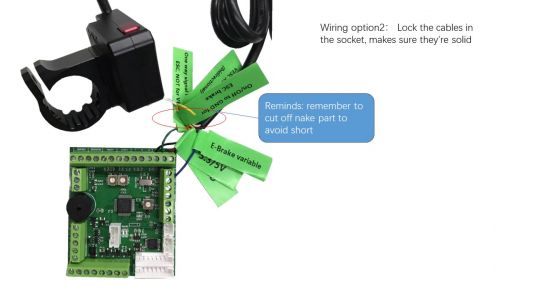
[[File:Wiring2 on adc adapter.jpg|frameless|533x533px]] | [[File:Wiring2 on adc adapter.jpg|frameless|533x533px]] | ||
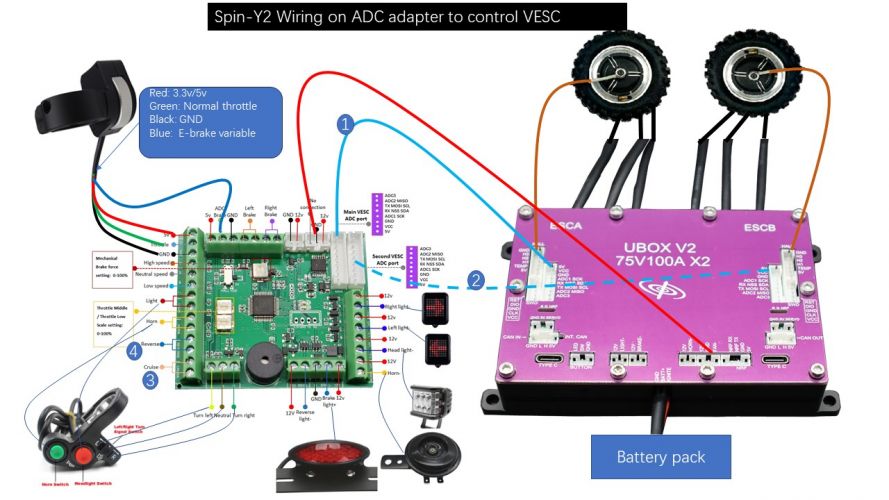
[[File:Wiring with ADC adapter.jpg|frameless|889x889px]] | |||
Then: | Then: | ||
# Set the start point to 0, as described above. | # Set the start point to 0, as described above. | ||
# Use the app configuration file we provided, load it in to VESC tool, and save it to ESC. File [https://github.com/JohnSpintend/ | # Use the app configuration file we provided, load it in to VESC tool, and save it to ESC. File [https://github.com/JohnSpintend/Spiny/blob/main/spiny2%20input%20with%20ADC%20adapter%20for%20single%20VESC.xml link]: (How to do it, see this [https://youtu.be/qODW8h2L4zs tutorial video]) | ||
#Watch [https://youtu.be/CZWyGyGVvDQ?si=R0YWiSEG83P0FPLH tutorial video] for wiring details and programming in vesc tool . | #Watch [https://youtu.be/CZWyGyGVvDQ?si=R0YWiSEG83P0FPLH tutorial video] for wiring details and programming in vesc tool . | ||
Latest revision as of 10:25, 7 May 2024
Editing, will be soon.
This is the manual for Spin-Y2(V2), V1 is here: Spin-Y manual V1
Spin-Y2 is a throttle for VESC and common e-scooter/bike.
Buy link: https://spintend.com/products/two-way-throttle-spiny-for-diy-escooter-diy-ebike
Feature
- Maximum Hand grip, specially at full throttle.
- Bidirectional operation (forward accelerate, backward e-braking) .
- Remapped 0-3.3v signal, extend the hall range to get more interference immunity, and safe for VESC and similar controllers compared to common 5V throttles.
- 5v signal out put for All standard controllers like Minimotors/ Dualtron/ zero/ Vsett and others.
- Variable e-brake up on reverse scroll.
- Standard controllers use it mid to max as throttle only, can block with screw backward rotation! Reverse scroll can be blocked by replacing one screw for a longer version (included), if user on standard controller doesn’t want it to scroll backward (one way operation)
- Click rear button to trigger cruise function.
Specification
| Working voltage | 3.3-5V |
| Out put resistance of VESC/normal throttle, variable brake | 330 ohm |
| ON resistance of E-brake | Less than 2 ohm |
| Off load current, 5V supply, no driving out | Less than 50 mA |
| Normal throttle and variable brake output range | 0--4.2V, adjustable |
| Variable brake output range | 0.7--4.2V |
| VESC throttle out put range | 0--3.3V, bidirectional, 1.65V at center position |
| Two head buttons | 12V, 2A |
All the values are approximate value, at 5V supply, unless otherwise specified.
| Color | Function | Explaination |
|---|---|---|
| Black | - GND | Negative power supply, and low side of rear button and E-brake switch |
| Red | + 3.3/5V | Positive power supply, can accept 3.3-5V, recommend 5V |
| White | VESC Throttle | VESC ADC1, centered (bidirectional) |
| Green | Normal Throttle | One way signal for normal controller(ESC), NOT for VESC |
| Yellow | E-Brake ON/OFF | ON/OFF to GND for ESC brake |
| Blue | E-Brake variable | Variable brake for ESC that support it, like some ninebot, xiaomi, Sabvoton, Kelly and other |
Calibration
We can do three calibrations to make Spin-Y2 working more perfectly: wheel travel calibration, start point adjust for normal throttle, and end point adjust for normal throttle.
Spin-Y2 has three LEDs, under the wheel, to indicate the calibration state: green, yellow, red. For easy to observe the LED state, do calibration at a darker place will helps.
By hold the rear button when power on the Spin-Y2 more than 3 seconds, Spin-Y2 will enter the calibration mode.
Wheel travel calibration
Spin-Y2 can be more accurate after calibrate the wheel travel. Both the One way or two way mode are benefited.
- Hold the rear button during power on for more than 3 seconds, till the yellow LED start blinking, then release rear button.
- When yellow LED blinking, scroll the wheel to min and max for several times, then release the wheel.
- Quit, hold the rear button more than 3 seconds again, till the yellow LED stop blinking, and the green LED on.
- Check if the function is normal, if not, go to step 1 and try again.
Start point adjust for normal ESC
Start point is for normal ESC, usually they required the start voltage at 0.7V and end voltage 4.2V.
You can observe the ESC and motor to find the right start point.
- Hold the rear button during power on for more than 6 seconds, after the yellow LED blinking, the green LED will start blinking, then release the button.
- Push forward (accelerate) the wheel to rise the start point voltage, Pull backward (brake) the wheel to lower it, 0.025V a step. Watching the ESC, when the ESC starts to spin the motor, pull back the wheel 2-5 steps to lower the start point voltage to get a idle voltage.
- Quit, hold the rear button more than 3 seconds again, till the green LED turn to solid on.
- Check if the start point is meet your requirement, if not, go to step 1 and try again.
End point adjust for normal ESC
End point is for normal ESC, the ESC's acceptation of the end voltage is varying, adjusting the end point can match their requirements.
You can use a multimeter to measure the voltage of the wire (green) to get an accurate end point voltage, or watching the ESC and motor to make the decision.
- Hold the rear button during power on for more than 9 seconds, after the yellow LED blinking, green LED blinking, the red LED will start blinking, then release the button.
- Push forward (accelerate) the wheel to rise the end point voltage, Pull backward (brake) the wheel to lower it, 0.025V a step. Watching the ESC, when the ESC accelerating the motor no more, or the Spin-Y2's throttle voltage meets your ESC's requirement.
- Quit, hold the rear button more than 3 seconds again, till the green LED turn to solid on.
- Check if the end point is meet your requirement, if not, go to step 1 and try again.
Warning “End point Configuration” process will start your motors spinning, have your scooter on a riser (wheels in the air).
The E-brake and the variable(proportional) brake
When pull backward the wheel, the E-brake and variable brake wire will output a voltage, they can be used to control the controller's regenerative braking.
The difference of two brake signal is:
E-brake is a ON/OFF signal, which is the most ESC accepted. When pull back, the E-brake wire connected to GND, when wheel at center of push forward, E-break wire off to GND, pulled up by a voltage source such as 5V, 7.4V, mostly.
Spin-Y2 also monitoring the E-brake wire when pushed forward or in cruising, if this wire being pulled down as approximate to the GND, Spin-Y2 will cutoff the forwarding throttle output, thus stop the ESC, to avoid the ESC run against the mechanical brake. Also quit the cruise when Spin-Y2 is cruising.
Some ESC can accept a Variable brake input, Variable brake is a proportional (analog ) signal follows the wheel's backward travel, when wheel at center of push forward, the variable brake wire outputs 0V, when pull back, outputs a 0-4.2V voltage as well as the angle of the wheel being pulled.
The VESC throttle and normal throttle
The VESC throttle is in 3.3V range, pull backward is 0V, push forward is 3.3V, the center is 1.65V.
The default normal throttle's range:
Backward to center----0V.
Center to forward----0-4.2V.
Reminds: If you're using our Ewheel ADC adapter to wire with the SPIN-Y2 throttle, should NOT use VESC throttle cable, and need to use Normal Throttle cable
Wiring on Non-VESC
Wiring on VESC directly
| Color | Spin-Y2 | UBOX |
|---|---|---|
| Black | GND | GND |
| Red | +3.3v/5v | 3.3v(VCC) or 5V |
| White | VESC throttle | ADC1 |
Remark: 1. due to Spiny-Y2 is two way throttle, it has bidirectional signal , so no need to do any wiring on ubox (or other VESC) 's ADC2 port.
2. Watch detial tutorial video for your wiring and setup input.
Wiring on Adapter V2 to control VESC
Our Adapter V2 is designed for 5V hall system, has built in 5V-3.3V voltage translator, so recommend to set Adapter throttle supply to "5V“. And we suggest to set VESC ADC control mode to "Current No Reverse Brake ADC2" mode.
The default output voltage of Spin-Y2 is 0.7-4.2V, we need to set the start voltage to 0V.
Make connection as below:
| Color | Spin-Y2 wire | Adapter V2 |
|---|---|---|
| Black | GND | GND |
| Red | +3.3V/5V | 5V |
| Green | Normal Throttle | THR |
| Blue | E-Brake variable | ABRK |
Then:
- Set the start point to 0, as described above.
- Use the app configuration file we provided, load it in to VESC tool, and save it to ESC. File link: (How to do it, see this tutorial video)
- Watch tutorial video for wiring details and programming in vesc tool .
FAQ
How does on/off brake and cruise function work?
When the wheel being pushed forward, if the rear button is pressed, Spin-Y2 will hold the throttle output voltage at this time, keeping it till the button be re-pressed or the wheel be pushed backward. Or the mechanical braking is detected.
When the pull the wheel backward (to right), it's wire(yellow) will connect to the GND by a MOSFET. When wheel released or pushed forward, the connection to the GND will be release.
Can I connect Spin-Y2 to VESC and supply it with 5V?
Yes you can, but connect the "VESC throttle" (white wire) to the VESC's ADC input, this wire is a bi-directional signal, 0-3.3V, center is 1.65V, the "Common throttle" is 0.7V to 4.2V in default, which is not safe for VESC, VESC's safe input is 0-3.3V.
The Spin-Y2 can be supplied with 3.3-5.0V, and the output signal voltage range is unaffected by the supply voltage.
Caution and limits
Warning :
- Throttle can not disengage Cruise when driver presses Brake Lever - scooter will slowdown with motors disengaged as long as you hold the lever, but once Brake lever released Scooter will get back to Cruise speed. (it is useful feature in city driving in lower power mod, but Be careful in high power modes).
- “End point Configuration” process will start your motors spinning, have your scooter on a riser (wheels in the air).


