Difference between revisions of "How to upgrade the firmware of the receiver?"
m (→Prepares: receiver page) |
|||
| (14 intermediate revisions by one other user not shown) | |||
| Line 1: | Line 1: | ||
Uni1 remote V2 and its receiver (built in Ubox or standard one) have built in bootloader, so we can upgrade their firmware when new feature added or for fix issues. | Uni1 remote V2 and its receiver (built in Ubox or standard one) have built in bootloader, so we can upgrade their firmware when new feature added or for fix issues. | ||
The upgrade is through USB cable with a PC app, the remote is integrated a USB to UART bridge chip, CH340 | The upgrade is through USB cable with a PC app, the remote is integrated a USB to UART bridge chip, CH340. The remote is directly upgrade by USB cable connection, the receiver's upgrade is relied by remote through their RF inter-communication. | ||
== Prepares == | == Prepares == | ||
The wireless upgrade requires: a windows PC, a Uni1 remote V2, a USB cable with a type-C connector. | The receiver's wireless upgrade requires: a windows PC, a Uni1 remote V2, a USB cable with a type-C connector. | ||
CH340 driver download: | |||
https://github.com/JohnSpintend/Remote-receiver-FW/blob/main/receiver/CH341SER.ZIP | |||
PC APP download: | |||
https://github.com/JohnSpintend/Remote-receiver-FW/blob/main/receiver/RF%20Upgrader%20V0.92.exe | |||
Firmware download: | Firmware download: | ||
[https://github.com/JohnSpintend/Remote-receiver-FW/tree/main/receiver https://github.com/JohnSpintend/Remote-receiver-FW/blob/main/receiver/ubox_v2_rx_iap_head_light.binpak] | |||
== Install driver == | == Install driver == | ||
| Line 21: | Line 31: | ||
Click ok. | Click ok. | ||
Power on the remote, connect it to the PC with USB cable, go to windows's Device Manager, Win key + R, then type in ‘devmgmt.msc’ and click ‘ok’. | |||
[[File:Run device management.jpg]] | [[File:Run device management.jpg]] | ||
| Line 33: | Line 43: | ||
== Upgrade FW == | == Upgrade FW == | ||
Go into Remote's setting menu->Receiver Config->Receiver Upgrade, click ENTER. | |||
Run RF Upgrader V0.92.exe on windows PC. | Run "RF Upgrader V0.92.exe" on windows PC. | ||
[[File:Run RF upgrader.jpg]] | [[File:Run RF upgrader.jpg]] | ||
Choose the COM port, and choose the file with | Choose the COM port, and choose the file with ".binpak" extension. | ||
Click | Click "Upgrade" or "Auto" button. | ||
[[File:Click upgrade in RF upgrader.jpg]] | [[File:Click upgrade in RF upgrader.jpg]] | ||
Connect Ubox with a power source, stay close with remote, then hold the power button, don’t release it, the RF Upgrader will start to download the new firmware into the receiver. | Connect Ubox with a power source, stay close with remote, then hold the power button, don’t release it, the RF Upgrader will start to download the new firmware into the receiver. | ||
'''For the stand alone receiver, we need to avoid the Ubox's internal receiver get in the upgrading, we can power on Ubox first then do above steps, at this step, plug the cable into Ubox's mutifunctional socket, to power on the stand alone receiver.''' | |||
[[File:Upgrade in progress.jpg]] | [[File:Upgrade in progress.jpg]] | ||
| Line 55: | Line 67: | ||
== Concludes and explain == | == Concludes and explain == | ||
# The bootloader | # The bootloader work within a 0.3-0.5 second time window to check if there is a upgrade packet send to it. So we need to give the receiver a re-power on. For Ubox V2, we can re-power on it, for a standard receiver, we can re-plugin its cable in to a VESC to get re-power on. | ||
#If the RF Upgrader APP has some errors can't be quit or closed, use task manager (ctrl + shift + esc) to end it manually. | |||
== Limits and caution == | == Limits and caution == | ||
Latest revision as of 16:11, 20 September 2023
Uni1 remote V2 and its receiver (built in Ubox or standard one) have built in bootloader, so we can upgrade their firmware when new feature added or for fix issues.
The upgrade is through USB cable with a PC app, the remote is integrated a USB to UART bridge chip, CH340. The remote is directly upgrade by USB cable connection, the receiver's upgrade is relied by remote through their RF inter-communication.
Prepares
The receiver's wireless upgrade requires: a windows PC, a Uni1 remote V2, a USB cable with a type-C connector.
CH340 driver download:
https://github.com/JohnSpintend/Remote-receiver-FW/blob/main/receiver/CH341SER.ZIP
PC APP download:
https://github.com/JohnSpintend/Remote-receiver-FW/blob/main/receiver/RF%20Upgrader%20V0.92.exe
Firmware download:
Install driver
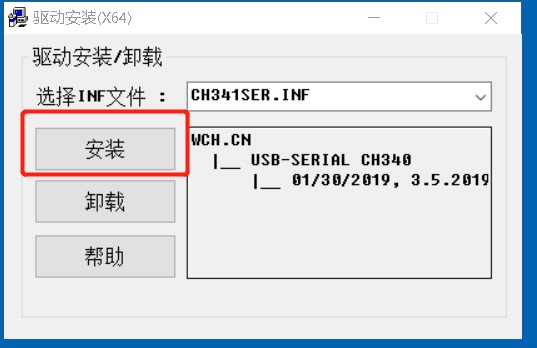
Install the CH340 driver, CH340 is the remote’s internal USB to UART bridge.
Run the ‘CH341SER.EXE’.
Click ‘安装’
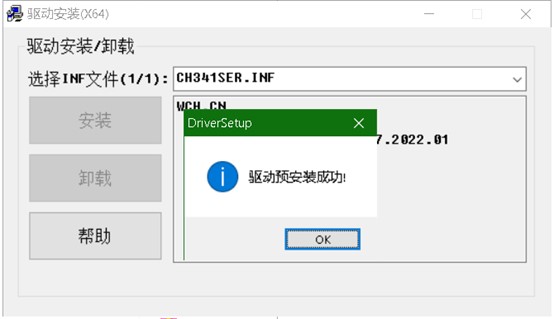
Click ok.
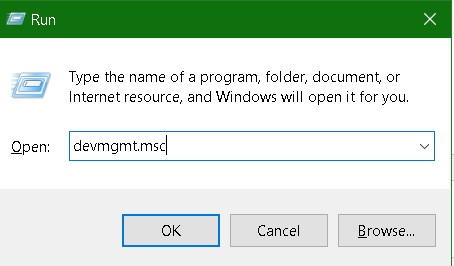
Power on the remote, connect it to the PC with USB cable, go to windows's Device Manager, Win key + R, then type in ‘devmgmt.msc’ and click ‘ok’.
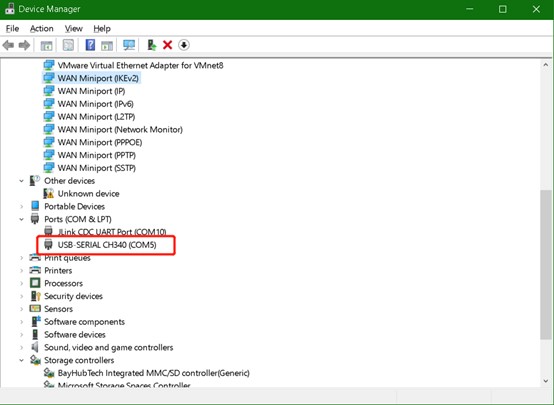
In the Device Manager:
check the Ports list, to find a COM port named with ‘CH340’. The number will be used in upgrade APP.
Upgrade FW
Go into Remote's setting menu->Receiver Config->Receiver Upgrade, click ENTER.
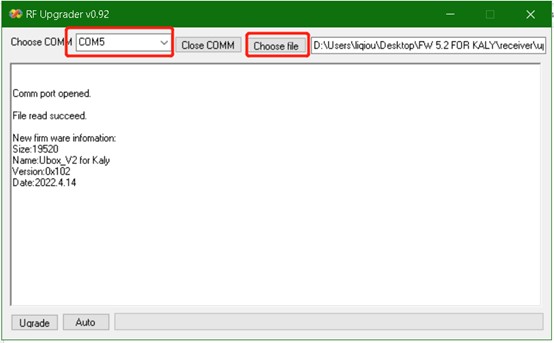
Run "RF Upgrader V0.92.exe" on windows PC.
Choose the COM port, and choose the file with ".binpak" extension.
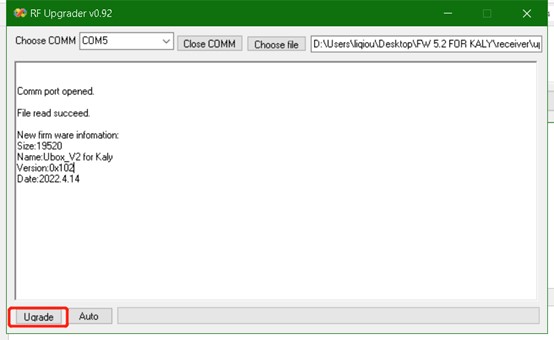
Click "Upgrade" or "Auto" button.
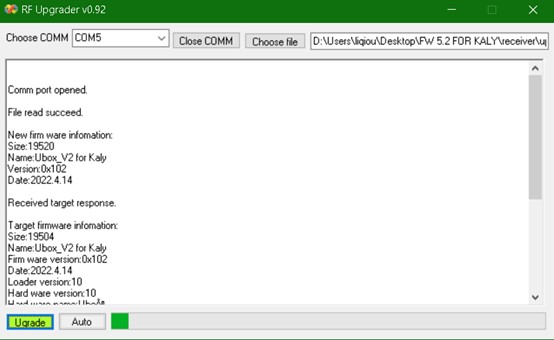
Connect Ubox with a power source, stay close with remote, then hold the power button, don’t release it, the RF Upgrader will start to download the new firmware into the receiver.
For the stand alone receiver, we need to avoid the Ubox's internal receiver get in the upgrading, we can power on Ubox first then do above steps, at this step, plug the cable into Ubox's mutifunctional socket, to power on the stand alone receiver.
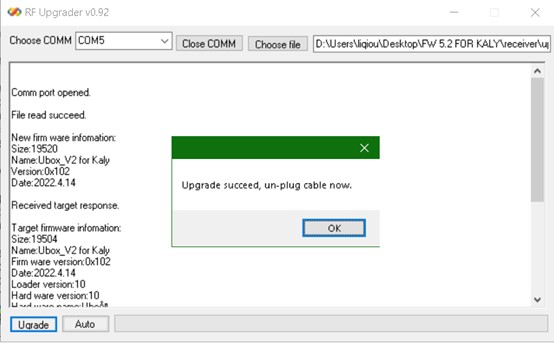
Finished, click ok, release the power button, EXIT upgrade on the remote, then do next one. When all finished, click the Close COMM button on the RF Upgrader APP, then close the APP.
Concludes and explain
- The bootloader work within a 0.3-0.5 second time window to check if there is a upgrade packet send to it. So we need to give the receiver a re-power on. For Ubox V2, we can re-power on it, for a standard receiver, we can re-plugin its cable in to a VESC to get re-power on.
- If the RF Upgrader APP has some errors can't be quit or closed, use task manager (ctrl + shift + esc) to end it manually.
